The shadow is not one problem. A hard diagonal thrown by afternoon sun, a soft pool under a coffee cup, your own silhouette leaning into a document you photographed — these look similar in a thumbnail and behave completely differently once you try to get rid of them.
One thing is true of all of them. A shadow hides information, and no software recovers information that the sensor never recorded. What a shadow remover does is relight what it can still see and invent the rest. In the shade of a light shadow there is usually plenty still visible. In crushed black there is nothing, and the model fills the gap with a guess that looks right rather than a copy of what was there.
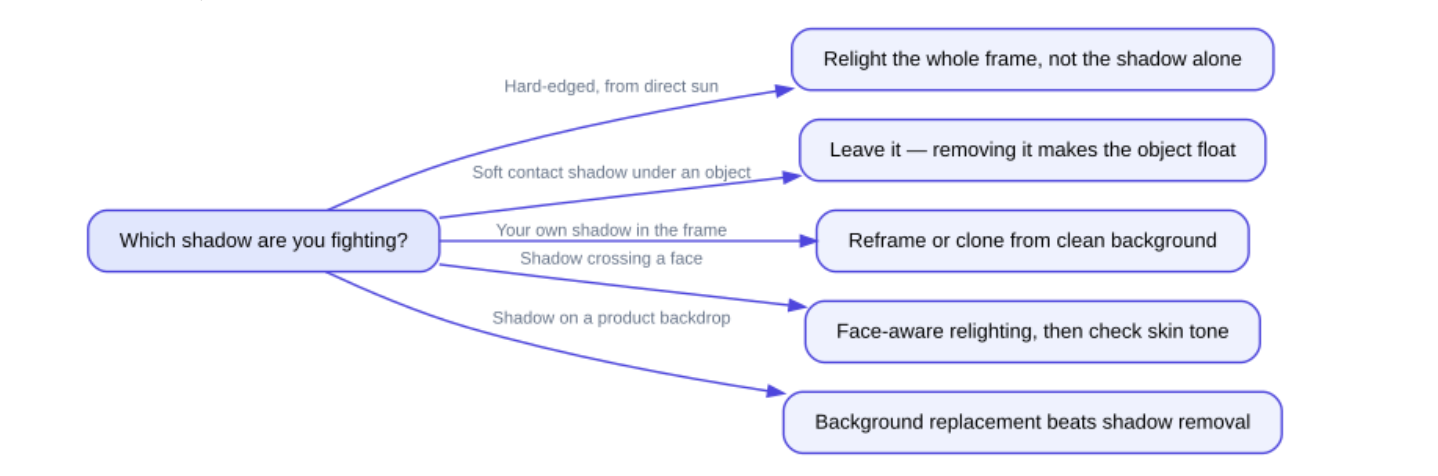
The five shadow situations covered below, each with the move that tends to work for it.
|
The shadow you have |
What is under it |
Realistic outcome |
|---|---|---|
|
Hard cast shadow, direct sun |
Detail, but several stops darker and often color-shifted blue |
Good, if the shadow is not clipped to black |
|
Soft contact shadow under an object |
The surface the object sits on |
Removable, but usually a mistake to remove |
|
The photographer’s own shadow |
Background the camera never saw lit |
Fully reconstructed — treat as invented |
|
Shadow across a face |
Skin, with texture partly preserved |
Good on soft edges, risky across a hard line |
|
Shadow on a product backdrop |
Plain backdrop paper or wall |
Easy, because the fill is uniform |
A hard cast shadow from direct sun
Midday sun produces a shadow with a knife edge and a several-stop drop in brightness. Two things go wrong at once: the shaded region is dark, and it is a different color, because it is lit by blue sky rather than by the sun. A tool that only lifts brightness leaves a cool patch that reads as a bruise.
Check the original before you process anything. Open the file and look into the darkest part of the shadow — if you can make out any structure at all, a relighting model has something to work from. If it is a flat black shape with no variation, the pixels are clipped, and whatever comes back is fabrication.
The practical move on a hard shadow is to relight the whole frame rather than surgically erase one shape. Erasing produces a rectangle of unnaturally even light where a shadow used to be, and the eye finds it instantly.
The soft shadow under an object
This one is a trap. The soft darkening where a bottle meets a table is a contact shadow, and it is the only cue telling the viewer that the bottle is standing on something. Remove it and the object hovers.
Targeting matters here, which is why prompt-driven tools are useful — you want to clear the harsh diagonal across the backdrop while keeping the two centimeters of shading directly under the base. LightX’s shadow tool works this way: you upload a JPEG or PNG, the prompt field is pre-filled with “remove shadows”, and you edit it to name the specific shadow. Its documentation lists JPEG and PNG only, so a HEIC straight off an iPhone needs converting first.
Your own shadow in the frame
Photographing a document, a painting or a flat product from above puts your body between the light and the subject. There is no lit version of that area anywhere in the file, so nothing can be recovered — every pixel in that region will be generated.
On a plain surface this is fine, because the model only has to continue a uniform tone. On a page of text it is not fine at all: generated letterforms are the same failure as generated text anywhere else, and words in the shadowed strip can come back subtly wrong. Reshoot from a different angle if the document matters. It takes ten seconds.
A shadow across a face
Faces are the hardest case and the most common one. A hat brim, a window frame, a nose shadow from an overhead bulb — each puts a hard line across skin whose texture and tone must match on both sides after the fix.
Overchat AI’s Shadow Remover is aimed squarely at this. The page describes four steps — upload, choose which shadows, press Remove shadows, then compare with a slider and download — and states about 30 seconds per photo, no account, no watermark, and an HD download. It accepts JPG, PNG, WebP, BMP and iPhone HEIC. Two things on that page are worth taking seriously. It says you can narrow the job to one shadow with a hint like “shadow under the bottle” rather than clearing everything. And its FAQ is blunt that the tool improves lighting but does not add detail, so a blurry low-resolution photo comes back blurry and better lit.
Pricing is worth a line here, because the Shadow Remover is not sold on its own. Overchat AI bundles it with 150+ other purpose-built tools spanning image, video, audio and text — an all-in-one app running models from GPT, Claude, Gemini, Grok, Kimi and Qwen across web, iOS and Android, with 350,000+ users. Pro costs $14.99 a month, or $59.99 for the year. The free plan covers 20 messages a day to basic models plus limited trial image generation, enough to learn whether a particular photo responds before anyone pays anything.
Evoto approaches face shadows from the portrait-workflow side. Its page describes a one-click face shadow removal for uneven lighting from direct sun, hat brims and mixed indoor light, with a four-stage flow — upload, generate, compare, download at original resolution — and lists JPEG, JPG, PNG and WebP. It states processing of 45 seconds to a couple of minutes per image depending on resolution and shadow complexity, and its FAQ says results vary with image quality, pose and format. Browser use requires a free sign-up, which is the friction point if you only have one photo to fix.
Whichever you use, inspect the skin at the old shadow boundary at full zoom. A faint tonal seam running exactly where the line used to be is the usual tell, and it survives casual viewing but not a large print.
Shadows on a product background
A shadow falling on white backdrop paper behind a product is the easiest case in this article, because the model is filling a plain area with more of the same plain area. It is also frequently the wrong job. If the backdrop needs to be clean white anyway, replacing the background outright removes the shadow as a side effect and gives a more reliable result than relighting.
Keep shadow removal for the shadows falling on the product itself — a hard edge from a desk lamp across a label, for instance, where the label detail is still faintly visible underneath.
What none of it can do
The honest division runs between pixels that still hold a faint record and pixels that hold nothing at all.
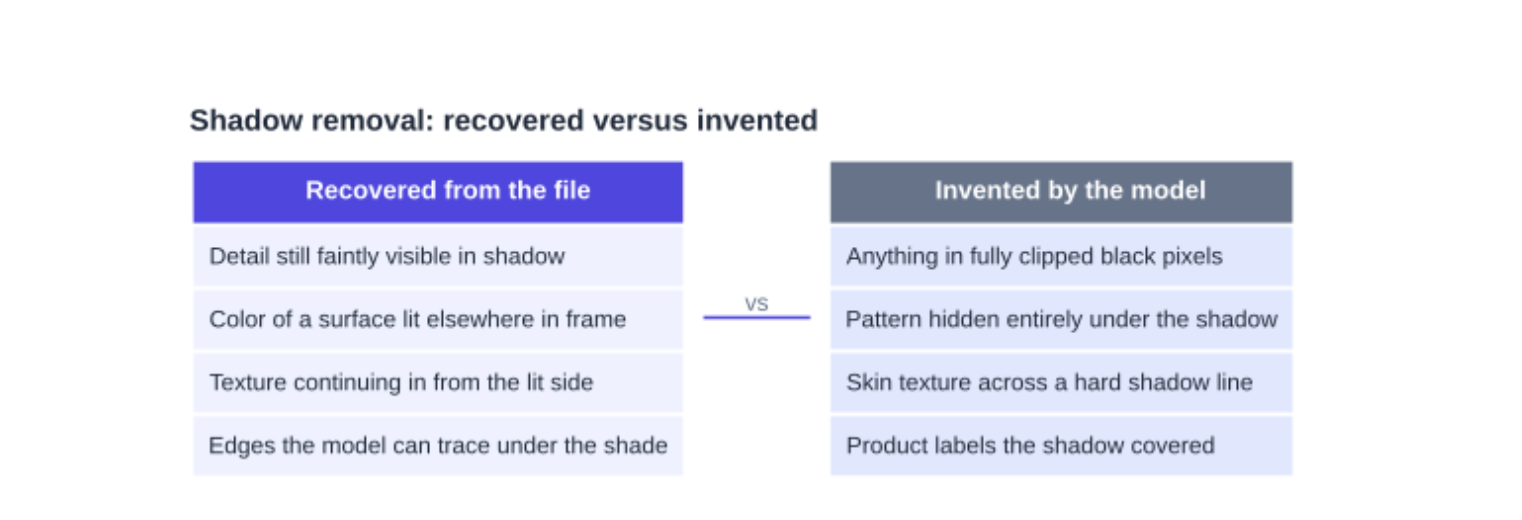
The dividing line that decides how much of a de-shadowed photo you can trust: what was still faintly recorded, versus what the model had to make up.
None of these tools sharpens. None of them recovers a printed word, a serial number or a face that the shadow swallowed whole. And for anything used as evidence — an insurance photo, a condition report, an ID document — a relit image is an edited image, and the edit is not always disclosed by the file.
Shoot so you do not need any of this
Every fix above is repair work. The camera-side habits that avoid the damage cost nothing and take seconds.
Where to stand and how to light, summarized for the shadows described above; the gray rows are the setups that cause them.
Software has made shadows a solvable annoyance rather than a reason to reshoot. It has not made them free. Every removal trades a real record for a plausible one, and the size of that trade depends entirely on how dark the shadow was.